Integrating TestLink / Jenkins / JMeter - described
Required/referenced artifacts
The listed artifacts below were the currently available versions at the time of integration.
Artifact |
Installed/coherent version |
Homepage/Download page |
Installed |
|---|---|---|---|
TestLink |
1.9.9 |
TestLink server |
|
Jenkins |
1.542 |
Jenkins build machine |
|
JMeter |
2.10 |
Jenkins build machine |
|
libxml-xpath-perl |
1.13-7 |
http://packages.debian.org/search?keywords=libxml-xpath-perl |
Jenkins build machine |
TestLink plugin |
3.9 |
– |
|
Ant |
1.7.1 |
Jenkins build machine |
|
jmeter-ant-task |
1.1.1 |
Jenkins build machine |
|
TAP (Test Anything Protocol) |
13 |
Standard adherence - RTM |
All underlying framework, such as a stable ubuntu version, mysql and perl on the Jenkins build machine and TestLink server machine above are expected to be in place prior to adding the listed artifacts.
Intended audience of this description
Staff working with:
- Requirements authoring (requirement owners / solution architects / senior testers)
- Test case authoring (test staff / solution developer working with test)
The intended outcome of this description
For descriptions on the bulleted items below, see their respective link in the table above.
This documentation DOES NOT describe:
- How to install TestLink
- How to install Jenkins
- How to install Jenkins plugins
- How to install JMeter
- How to install libxml-xpath-perl
- How to install Ant
- The TAP 13 file format
This documentation DO describe:
- How to setup Ant and TestLink plugin in Jenkins
- How to "connect" Jenkins to TestLink
- How to "connect" Jenkins to JMeter
- How to "backwards annotate" gained results from JMeter to TestLink via Jenkins
How to setup Ant and TestLink plugin in Jenkins
To make sure the jmeter-ant-task is found, a Jenkins external ant shall be in place.
To comply with where most other java library jars are located, the jmeter-ant-task jar file shall be stored in "java's own library directory" - for me it was /usr/share/java
Download the ant-jmeter-task jar file from the download link found on the programmerplanet link in the table above.
Create a relative, soft link to the jar file in the same location as where you put the physical file.
Finally, create a relative link to the newly created, relative link in the "ant library directory" - for me it was /usr/share/ant/lib
After downloading the jar and creating the links you'll have something resembling this:
Then, in jenkins, you shall make the following settings. As stated above, installation of ant is outside scope of this description.
Before setting up the TestLink plugin in Jenkins, you must prepare a 'Personal API access key' in TestLink.
Creation of the key is done in TestLink under 'My Settings', as shown below.
The key is known as 'Developer Key' from Jenkins point of view, when setting up the TestLink plugin:
After having set-up the ant part in Jenkins, you'll need to make Jenkins aware of TestLink:
How to "connect" Jenkins to TestLink
In Jenkins, create a new 'free-style software project' job as shown below. This sequence is done only once per project and connects the testcases from TestLink with a stated TestLink project name AND TestLink testplan. Using Jenkins to start different sets of testcases, either select different TestLink projects, different TestLink testplans or a combination of the two, for each defined Jenkins job.
When the job is created, it need to be set-up as shown below.
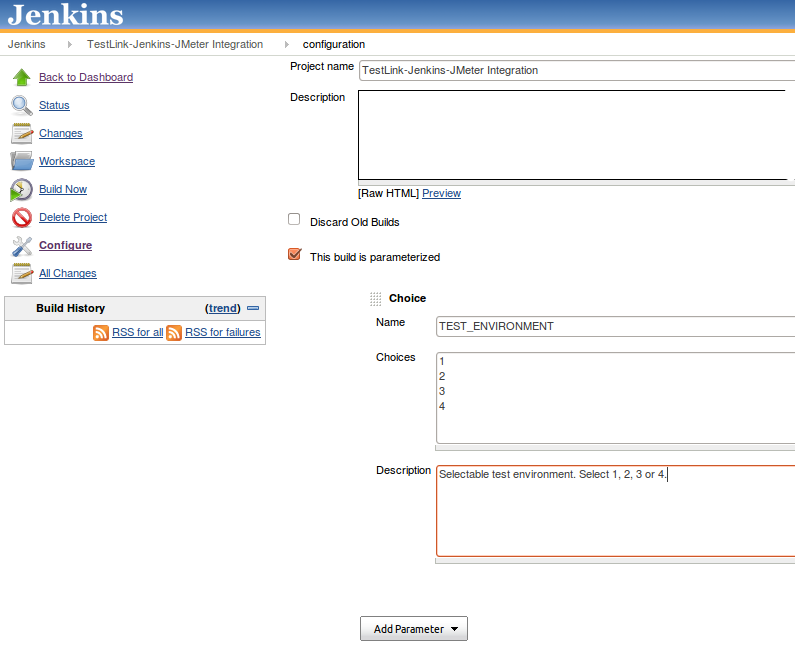
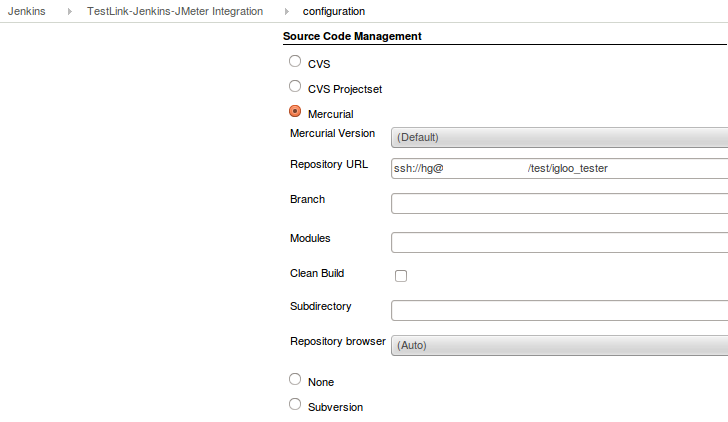
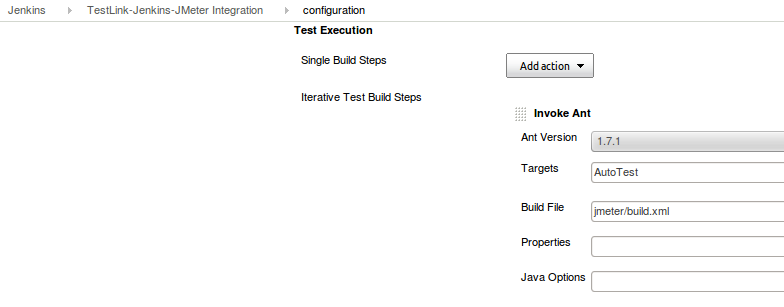
The details on the following pictures are shown in the order they are listed, top-most first, in Jenkins' project's 'Configure' view.
A good idea is to control certain test settings at build time.
To enable this, define - when configuring the Jenkins job or change it at a later stage - the parameters you want to control.
The parameters defined here will be forward-able - at build time - to JMeter indirectly via ant, thus enabling detailed control also at build time.
The mercurial repository must be set-up, to always be able to run the tests using the latest checked in test cases "from" JMeter.
It may be a good idea to also turn on explicit time stamping of each build step in Jenkins.
This is how I set it up and is, of course, not mandatory.
In the 'Build' part of the job definition, I selected to start the build sequence with an 'Invoke Ant' step, ti discard any old build log files and intermediate files.
This is not mandatory but, if any old TAP files still exists, may give inconsistent results returned to TestLink when executing the 'Result Seeking'...
The next step, of the 'build' sequence, is to pinpoint the exact TestLink artifacts I'm interested in.
Here, you select the defined (previous chapter) TestLink instance.
The 'build name' will automatically create a new build instance in TestLink, which is very convenient.
The 'custom fields' are used by ant when selecting the test file to execute in JMeter and by the TestLink TAP parser when parsing the results returned originally from JMeter.
The parameters to define are:
- TestLink Project Name
- TestLink Test Plan Name
- Build Name. Here I used a static text followed by build-time parameters provided by Jenkins
- Custom Fields. These must match the defined Custom fields from TestLink that you must use...
Connected to the TestLink Configuration you must execute the ant build script located in the jmeter directory at the top level of the test case repository. For this to work, you must already have installed an external ant version and added the jmeter-ant-task library jar to it.
There's only ONE build target for Jenkins to use - the AutoTest target. The AutoTest target can be used from a command line in linux as well, given that you provide the required parameters that come automagically when running from Jenkins. A working example - when standing in the top level directory of the JMeter project (/repository/igloo_tester/jmeter) is shown below. This will produce xml log files and xslt'ed html files only and wont propagate gained results to TestLink. For a full listing of the ant script, see chapter 'How to "connect" Jenkins to JMeter' further down:
ant -DGUI=false -DTEST_ENVIRONMENT=2 -DTESTLINK_TESTCASE_TESTFILEPATH=utils/SkapaEngagemang.jmx AutoTest
The two parameters to set here are:
- Targets - Autotest
- Build File - jmeter/build.xml
After having executed all testcases in the iterative test build steps above, the xml output files from JMeter must be translated into one of the formats that the TestLink plugin support. The three available formats are logs formatted according to log file formats JUnit, TAP and TestNG. The testcases we execute are not performance related, thus we have no direct use for any performance data, which is what JMeter is mainly made for. We're instead focused on verifying the functionality of the target system and are more interested in recording the assertions outcome and will constrain our effort to record PASS or FAIL on a per test step basis.
The script executed below (partly shown in the Command part) will translate the xml files from JMeter XML log file format to TAP 13 format, to enable the TestLink plugin to interpret the outcome. See chapter 'How to "backwards annotate" gained results from JMeter to TestLink via Jenkins' further down for the bash script details. The script can be pasted into the 'Execute shell' 'Command' part below.
The Result Seeking Strategy indicate to TestLink plugin what output to look for. In our case it is TAP 13.
The parameters to set here are:
- Include Pattern (ant'ish) - **/out/.tap
- Key Custom Field (this must match what you state on a test case basis) - in my case 'JMeter TestCase'
- Select the Attach TAP YAMLish attachments (I'm not sure if this is required to interpret the YAMLish provided by the bash script, but it doesn't hurt)
The final part is optional. If you want the test results reflected also in Jenkins, you must have the TAP plugin installed in Jenkins.
Then, to make it work, state the following parameters:
- Test results (ant'ish) - **/out/.tap
- Check the checkbox 'Is TAP plan required?'.
How to "connect" Jenkins to JMeter
The ant build script listed below is required to enable Jenkins starting JMeter with all needed parameters.
<?xml version="1.0" encoding="UTF-8"?>
<project name="JmeterTest">
  <!-- For details of how to use this jMeter wrapper, see information on:                -->
  <!-- http://www.programmerplanet.org/projects/jmeter-ant-task/                         -->
  <!--                                                                                   -->
  <!-- For an example of a jmeter ant build script, see:                                 -->
  <!-- http://sub-second.blogspot.se/2012/03/how-to-integrate-jmeter-into-ant-build.html -->
  <!--                                                                                   -->

  <!-- The ant build script is located in our project's top directory jmeter...          -->
  <!-- The script is normally started either from command line in directory jmeter or    -->
  <!-- from within a Jenkins project.                                                    -->
  <property name="project.root" value="."/>
  <property name="output.root" value="${project.root}/out"/>
  <property name="jmeterhome" value="/opt/apps/jmeter/current"/>

  <!-- Disclose all defined environment variables to ant.                                -->
  <property environment="env"/>

  <!-- If either of user root or jenkins started the ant build (in our project)set the   -->
  <!-- property jenkinsBuild.                                                            -->
  <!-- The list below can grow with other "jenkins users" when needed.                   -->
  <condition property="jenkinsBuild">
    <or>
      <equals arg1="${env.USER}" arg2="jenkins"/>
      <equals arg1="${env.USER}" arg2="root"/>
    </or>
  </condition>

  <!-- If one of the defined "jenkins users" above started the ant script, here's where  -->
  <!-- the stylesheetHome variable is set.                                               -->
  <target name="JenkinsIgnited" if="jenkinsBuild">
    <property name="stylesheetHome" value="${project.root}/stylesheets"/>
  </target>

  <!-- Otherwise - if an ordinary user started this script - here's where the            -->
  <!-- stylesheetHome variable is set.                                                   -->
  <target name="UserIgnited" unless="jenkinsBuild">
    <property name="stylesheetHome" value="${jmeterhome}/extras"/>
  </target>

  <!-- A build target to remove an existing output directory and all its content.        -->
  <target name="clean">
    <delete dir="${output.root}"/>
  </target>

  <!-- Create the output directory if not already done.                                  -->
  <!-- Declare the testplan.filename variable to be used when running jmeter.            -->
  <!-- The declaration MUST have a defined variable TESTLINK_TESTCASE_TESTFILEPATH in    -->
  <!-- calling environment to know what file to use for test by jmeter.                  -->
  <!-- Thus, the correct syntax for starting this ant build script from command line is: -->
  <!-- ant -DGUI=false -DTEST_ENVIRONMENT=2 -DTESTLINK_TESTCASE_TESTFILEPATH=test.jmx    -->
  <!--     AutoTest                                                                      -->
  <target name="create-output-directory">
    <!-- Prepare the out directory.                                                      -->
    <mkdir dir="${output.root}" />

    <!-- Sort out filename of the testplan.                                              -->
    <basename property="testplan.filename" file="${env.TESTLINK_TESTCASE_TESTFILEPATH}" suffix=".jmx"/>
    <echo message="testplan.filename: ${testplan.filename}"/>
  </target>

  <!-- Define jmeter task. Needed to trigger the ant-jmeter add-on.                      -->
  <taskdef name="jmeter" classname="org.programmerplanet.ant.taskdefs.jmeter.JMeterTask"/>

  <!-- Run the specified JMeter TestPlan file.                                           -->
  <target name="AutoTest" depends="create-output-directory,JenkinsIgnited,UserIgnited">
    <echo message="Test started by ${env.USER}."/>
    <jmeter
      jmeterhome="${jmeterhome}"
      testplan="${env.TESTLINK_TESTCASE_TESTFILEPATH}"
      resultlog="${output.root}/${testplan.filename}.xml"
      jmeterlogfile="${output.root}/jmeter.log">

      <property name="user.classpath" value="${jmeterhome}/lib/ext/ApacheJMeter_core.jar:${jmeterhome}/lib/ext/ApacheJMeter_java.jar"/>
      <!-- Force suitable defaults                                                       -->
      <property name="jmeter.save.saveservice.output_format" value="xml"/>
      <property name="jmeter.save.saveservice.assertion_results" value="all"/>
      <property name="jmeter.save.saveservice.bytes" value="true"/>

      <property name="GUI" value="false"/>
      <property name="TEST_ENVIRONMENT" value="${env.TEST_ENVIRONMENT}"/>
    </jmeter>

    <xslt
      in="${output.root}/${testplan.filename}.xml"
      out="${output.root}/${testplan.filename}.html"
      style="${stylesheetHome}/jmeter-results-detail-report_21.xsl"/>
  </target>
</project>
How to "backwards annotate" gained results from JMeter to TestLink via Jenkins
The bash script listed below is required to translate the JMeter XML log file into TAP 13 format that can be read by the TestLink plugin and the TAP plugin.
#!/bin/bash

# Parse each result file from the tests, created by JMeter when run by ant.
# Every file created by JMeter will be parsed consecutively by the following for loop.
for XML_resultfile in $(ls -1 jmeter/out/*.xml); do
  # debug
  echo "XML_resultfile: ${XML_resultfile}"
  # debug
  BASE_filename=$(basename ${XML_resultfile} .xml)
  TAP_filename=${BASE_filename}.tap

  # Create an array with just the testcases labels
  TestCases=( $(xpath -e '//@lb' ${XML_resultfile} 2>/dev/null | tr -d '"' | tr ' ' '_' | sed 's/^_//') )
  # Create an array with testcases labels and results
  ResultLines=( $(xpath -e '//@lb|//assertionResult/failure|//assertionResult/error|//assertionResult/failureMessage' ${XML_resultfile} 2>/dev/null | tr -d '"' | tr ' ' '_' | sed 's/^_//') )
  # Keep track of how many testcases there were
  num_of_testcases=${#TestCases[@]}

  # Reference to TAP13 file standard:
  # http://podwiki.hexten.net/TAP/TAP13.html?page=TAP13

  echo "TAP version 13" > jmeter/out/${TAP_filename}
  echo "1..${num_of_testcases}" >> jmeter/out/${TAP_filename}
  result_selector=0
  if [ ${num_of_testcases} -gt 0 ]; then
    for ((line=0; ${line} < ${num_of_testcases}; line++)); do
      # bash indices start at 0. Use presLine to present testcase number correctly.
      (( presLine=${line} + 1 ))
      # Some results are collected with no asserted results. When this is the case
      # all information is kept in one array item in the ResultLines array.
      # Some results come with passed or failed assertions. In these cases the
      # information is in the ResultsLine array, adjacent to the label. The res1
      # and res2 variables are used to index the adjacent array items.
      (( res1=${result_selector} + 1 ))
      (( res2=${result_selector} + 2 ))
      (( res3=${result_selector} + 3 ))
      # The label is parsed from the <sample> tag and has name 'lb' as can be seen
      # in the xpath call above.
      label="${BASE_filename} - ${TestCases[${line}]:3}"
      error_message=""

      if [ "${TestCases[${line}]}" == "${ResultLines[${result_selector}]}" ]; then
        # When a ResultLines array item is a label and the following item is a label
        # too, the result shall be translated to PASS - TAP13: 'ok'
        if [ "${ResultLines[${res1}]:0:3}" == "lb=" ]; then
          result="ok ${presLine} - ${label}"
        fi
        # Index must be increased by one
        (( result_selector+=1 ))
      fi

      if [ "${ResultLines[${res1}]:0:13}" == "<failure>fals" ]; then
        if [ "${ResultLines[${res2}]:0:11}" == "<error>fals" ]; then
          # When a ResultLines array item is a label and the following item have the
          # error tag set to 'false', the result shall be translated to PASS
          # - TAP13: 'ok'
          result="ok ${presLine} - ${label}"
          # When no error occurs, there's no failureMessage
          # Index must be increased by two
          (( result_selector+=2 ))
        fi

        if [ "${ResultLines[${res2}]:0:11}" == "<error>true" ]; then
          # When a ResultLines array item is a label and the following item have the
          # error tag set to 'true', the result shall be translated to FAIL
          # - TAP13: 'not ok'
          result="not ok ${presLine} - ${label}"
          error_message="message: '$(echo ${ResultLines[${res3}]} | cut -d '>' -f 2 | cut -d '<' -f 1)'"
          # When an error occurs, there's an accompanying failureMessage
          # Index must be increased by three
          (( result_selector+=3 ))
        fi
      else
        # The test step couldn't be executed for some reason
        if [ "${ResultLines[${res2}]:0:11}" == "<error>fals" ]; then
          # When a ResultLines array item is a label and the following item have the
          # failure tag set to 'false', the result shall be translated to FAIL
          # - TAP13: 'not ok'
          result="not ok ${presLine} - ${label} # TODO The test step failed in JMeter"
          error_message="message: '$(echo ${ResultLines[${res3}]} | cut -d '>' -f 2 | cut -d '<' -f 1)'"
          # When no error occurs, there's no failureMessage
          # Index must be increased by three
          (( result_selector+=3 ))
        fi

        if [ "${ResultLines[${res2}]:0:11}" == "<error>true" ]; then
          # When a ResultLines array item is a label and the following item have the
          # error tag set to 'true', the result shall be translated to FAIL
          # - TAP13: 'not ok'
          result="not ok ${presLine} - ${label} # TODO The test step failed in JMeter"
          error_message="message: '$(echo ${ResultLines[${res3}]} | cut -d '>' -f 2 | cut -d '<' -f 1)'"
          # When an error occurs, there's an accompanying failureMessage
          # Index must be increased by three
          (( result_selector+=3 ))
        fi
      fi

      if [ "${label}" != "" ]; then
        echo "${result}" | tr '_' ' ' >> jmeter/out/${TAP_filename}
      fi

      if [ "${error_message}" != "" ]; then
        echo "  ---" >> jmeter/out/${TAP_filename}
        echo "  ${error_message}" >> jmeter/out/${TAP_filename}
        echo "  severity: fail" >> jmeter/out/${TAP_filename}
        echo "  ..." >> jmeter/out/${TAP_filename}
      fi
    done
  else
    echo "TAP version 13" > jmeter/out/${TAP_filename}
    echo "1..1" >> jmeter/out/${TAP_filename}
    echo "not ok 1 - ${BASE_filename}" >> jmeter/out/${TAP_filename}
  fi
done


