Description
This plugin collects and publishes Robot
Framework
test results in Jenkins.
Preconditions: all "suggested plugins" are "installed" in Jenkins.
Current features
- Test suite and case details with trend graphs
- Environment variable expansion for build paths in configuration
- Wildcard support for output files for parsing and archiving of multiple Robot result files
- Collection and archiving of original Robot report HTML files
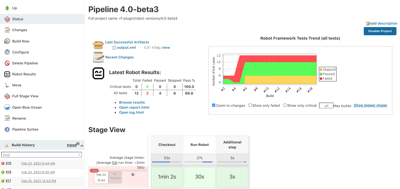
- Summary of Robot run on build page
- Summary of latest Robot run on project page
- Trend graph of passed tests over builds on project page
- Marking build failed/unstable/successful according to pass thresholds given by user
- Option of evaluating only critical tests against the pass thresholds
- Listview column to show overall passed/failed tests in project listing and duration trend
- Configurable archiving of arbitrary Robot related artifacts per build
- Token macros for usage with e.g. email-ext plugin
- Test visibility in radiator views
Configuration
Basic configuration of testing task
- Configure your project
- Select: Build -> Add build step -> execute shell/Execute Windows batch command
- Add the command to run the tests. You might have direct robot/jybot
command here like
robot --variable name:value --outputdir my_robot_results my_test_suiteor in case you need to do something more, you can call any script that you use for running the tests. Relevant part from Robot Jenkins Plugin point of view is that this script generates the Robot outputs. - Force your Robot script to return successfully from shell with
exit 0to empower the plugin in deciding if the build is success/failure (by default Robot exits with error code when there's any failed tests). You can do this for example by adding--nostatusrcto your test run (see Robot Framework user guide for details). - Select: Post-build Actions -> Publish Robot Framework test results
- Set path where your results are located (in above example command
my_robot_results) - If your output files are named differently than default (i.e.
output.xml, report.html and log.html) specify the filenames by
pressing the "Advanced..." button and writing the names in relevant
fields. The fields support wildcards
*and?. - If you have other artifacts such as screenshots that you want to
persist for viewing later in the logs you must configure them under
"Advanced... -> Other files to copy". The field accepts comma
separated list of files and supports wildcards
*and?. - Set thresholds and optionally disable thresholds for critical tests only to count every test in the pass percentage.
Pipeline configuration
- Run your tests in a similar way as you would normally by using the
shstep. - Call the plugin with either the general
stepor directly by callingrobot(only from version 2.0 onwards):robot outputPath: '.', logFileName: 'log.html', outputFileName: 'output.xml', reportFileName: 'report.hml', passThreshold: 100, unstableThreshold: 75.0
Configuring direct links to log files
Version 1.3.0
Links are automatically generated to whatever files are configured to "Report html" and "Log html" in the plugin configuration. Links to log and report HTMLs are now only in the summary sections in the middle of the page and the sidebar link from previous versions have been removed.
Version 1.2.3 and earlier
From version 1.2 it's possible to configure a direct link from both side panel and project/build page summaries to chosen file persisted with the build. If no file is configured the link won't show up. Steps to do this are as follows:
- Go to project configuration
- Configure the name of the file to be linked to Log/Report link field
- Make sure that you are saving the actual file you want to link with the build by checking the filenames/masks configured in the fields behind "Advanced..." button. By default these are output.xml, report.html and log.html which are the Robot Framework default names
- Save the configuration and run a build. The links are persisted per build in order to withstand changes in file naming. Thus the links won't appear in builds that exist already.
- Links should appear in the project/build summaries and in build side panel.
NOTE: After configuration change etc. the link will appear also in project side panel, but for now it doesn't appear there right after the build. Conversely, the project view side panel link won't go away until after configuration change/resave in project. We're working on a solution to this.
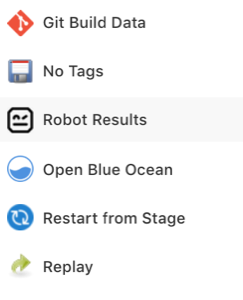 side panel link
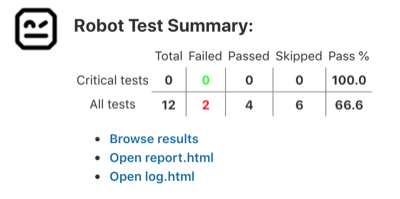 Summary link
Configuring Robot overall pass/fail to show in the project list
- Go to Jenkins front page
- Select the + sign in the top tabs of the project listing to create a new view or go to http://YOURJENKINSHOST/newView
- Name your view and proceed creating a list view
- Choose project you want to include to the view. By default the "Robot pass/fail" column will appear to the column listing.
- Save view and select it from the top tabs in Jenkins project listing
- (Optional) If you want to have the view on by default go to "Manage Jenkins"->"Configure System" (or http://YOURJENKINSHOST/configure )and select your newly created view to be the default one.
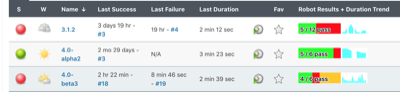 List view column in action
Using token macros in e-mail report
Prerequisites: token-macro plugin and email-ext plugin installed.
- Go to project configuration
- Enable "Editable Email Notification" in post-build actions (configuration reference)
- Now you can use the following Robot variables in your custom result email:
${ROBOT_FAILEDCASES}- Expands to list of failed Robot cases. Each case on its own line.${ROBOT_PASSPERCENTAGE, onlyCritical}- Expands to pass percentage of tests. (passed / total * 100 %),
onlyCritical - True if only critical tests should be calculated in percentage. Defaults to false.${ROBOT_PASSRATIO, onlyCritical}Expands to build result in 'passed / total' format.
onlyCritical - True if only critical tests should be calculated in percentage. Defaults to false.${ROBOT_REPORTLINK}- If logfile link is configured in the Robot plugin this link will point to that file for the build. Else show link to Robot reports directory for the build.
Displaying test numbers in build radiator views etc.
:warning: If the Robot plugin marks the build as failure the tests will not show up. This is because only unstable and successful builds are considered to have test results per Jenkins.
This means that in order to see the test results in other views you must set your unstable threshold so that the build never goes to failure.
Log File Not Showing Properly

If you see an error saying that Opening Robot Framework log failed, the most probable reason
is that your Content Security Policy is too strict. Similarly, if your log opens, but it doesn't
show embedded images or similar, the reason is most probably in CSP settings.
See here and here how to change you CSP settings in your script console, but be aware that Changing CSP settings will potentially expose you Jenkins instance for security vulnerabilities.
Robot Framework 4.x compatibility
The plugin supports both Robot Framework 3.x and 4.x output files. However, in order to support both, the plugin
shows some extra information for both. In Robot Framework 4.0 test criticality was removed and "SKIP" status was added. So for 3.x the
results overview will show a Skipped column, which will always be 0 and for Robot Frameowork 4.x output files
the Critical tests row will always be 0.
Skipped tests aren't taken into account when calculating pass percentage, but they are calculated to the total amount of tests.
Because criticality was removed in Robot Framework 4.0, having the Use thresholds for critical tests only checkbox
checked will always result in a passing step (because pass percentage is always considered to be 100% when there are
0 tests). In order to have set build status correctly, you must uncheck the checkbox or use onlyCritical: false
in your pipeline when you call robot.
We are planning of dropping support for Robot Framework 3.x and earlier some time in distant future.
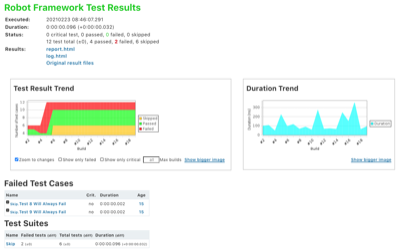
Overall Screenshots
Project view
Detailed build view