This plugin enables synchronization of YAML/JSON files stored in a Git repository with a Kubernetes application managed on the Nirmata platform.
Nirmata is a Kubernetes platform that enables enterprises to deliver a highly scalable, always-on container management platform, built on Kubernetes. Using Nirmata, enterprise teams can fully automate the delivery and management of applications. At Nirmata, our mission is to empower all enterprises to easily deliver and manage containerized applications across public and private clouds.
You can learn more on Nirmata Website
Features
- Update a running application in an environment
- Update an application in a catalog
- Deploy an ephemeral application
- Delete an ephemeral application
General information
This Jenkins Plugin supports update/deployment/deletion of applications in Nirmata.
Requirement
Jenkins
Jenkins 2.107.3 or newer is required.
Git
Git 2.17.0 or newer is required.
Setup
Install
Install this plugin via the Jenkins plugin manager or download the latest version of it from [https://github.com/jenkinsci/nirmata-plugin/releases].
Create Nirmata API Key
- To enable access to your Nirmata platform, you must generate API key:
- Sign-in to Nirmata platform
- Select Settings -> Users
- Click Generate API key
- Copy the generated API key
Add the Nirmata API key to Jenkins:
-
Navigate to your Jenkins hosting
-
Select "Credentials" from the Jenkins side panel
-
Choose a credentials domain and click 'Add Credentials'
-
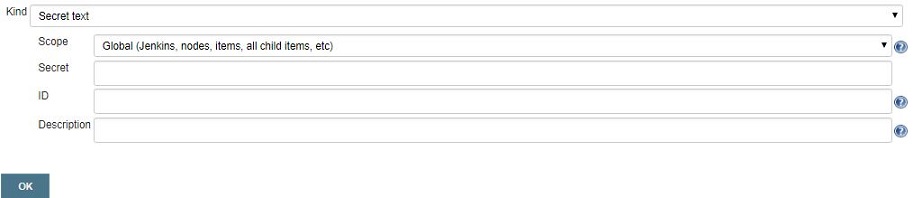
From the 'Kind' drop-down, choose 'Secret text'
-
Add the copied API key to 'Secret' textbox
-
Enter a description for the credential and save
Pre-job configuration
Freestyle job configuration
1. Update a running application in an environment
-
Create a new freestyle project
-
Select ‘Git’ under the section ‘Source Code Management’. Enter the URL of the GitHub repository. Specify the branch name of the repository

-
Enable ‘Poll SCM’ option under ‘Build Triggers’. This is required to remotely trigger a build

-
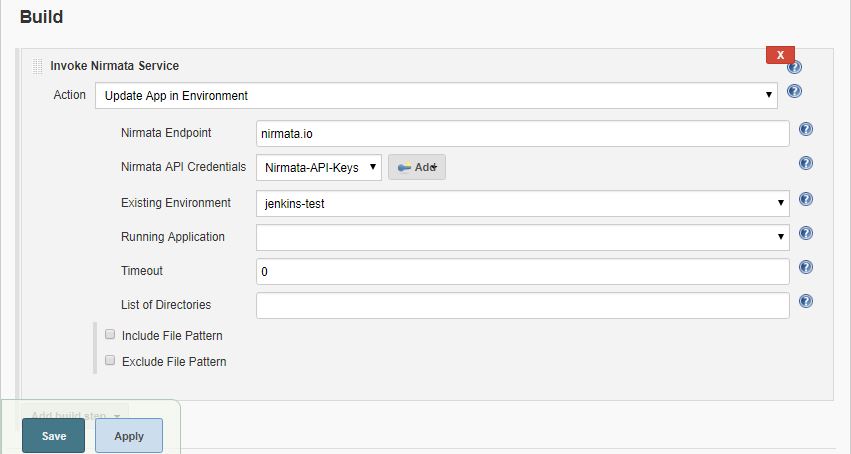
Furthermore, create a ‘Build step’ in the section ‘Build’ by selecting ‘Invoke Nirmata Service’ and select ‘Update App in Environment’ from the drop-down
-
Nirmata Endpoint - Enter base URL of the platform (default: nirmata.io)
-
Nirmata API Credentials - Select API key from the drop-down if already configured in the first step or else click ‘Add’ to add credentials
-
Existing Environments - Select environment from the list in the drop-down
-
Environment Applications - Select application which should be updated, from the dropdown
-
Timeout - Enter a time period to wait to pull the result from Nirmata
-
List of directories - Enter the relative path of the directory w.r.t locally stored repository containing YAML/JSON files. Multiple directories can be included using comma separator.
-
Include File Pattern - Add filename/extension/regex that should also be included for updating an application. By default, all .yaml, .yml, .json files present in the specified directories above would be included. Note that multiple filename/extension/regex can be included using comma separator.
-
Exclude File Pattern- Add filename/extension/regex for files in the mentioned directories that should be excluded for updating an application. Note that multiple filename/extension/regex can be excluded using comma separator.
-
-
Save/Apply configuration of the job
-
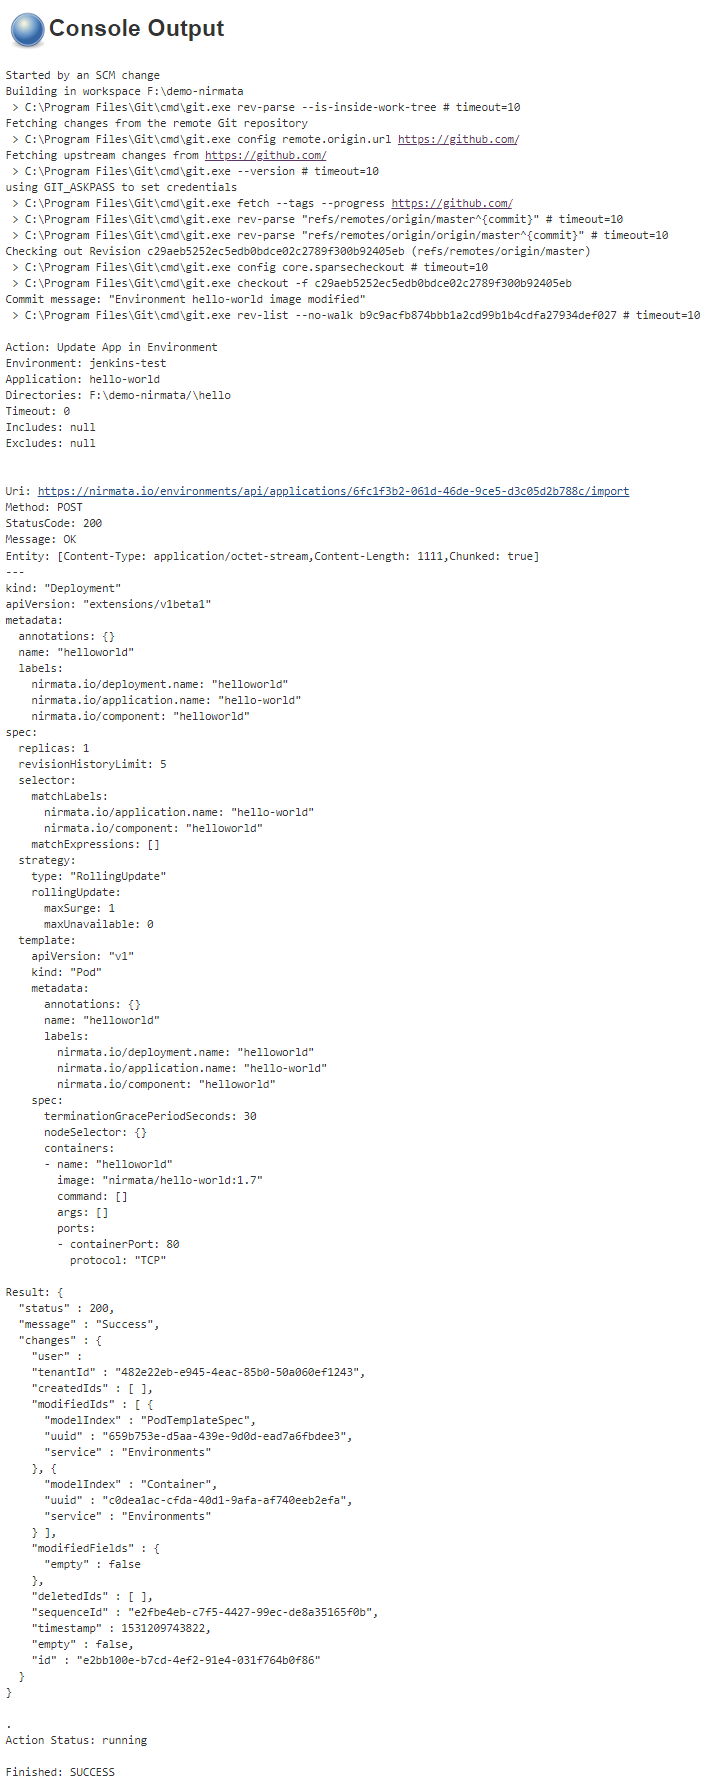
This job would be triggered on detection of a commit/change in the specified Git repo
-
The ‘Update App in Environment’ build step is marked successful if all the YAML/JSON files are imported successfully else it is marked as failed if any issue is encountered
2. Update an application in a catalog
-
Create a new freestyle project
-
Select ‘Git’ under the section ‘Source Code Management’. Enter the URL of the GitHub repository. Specify the branch name of the repository
-
Enable ‘Poll SCM’ option under ‘Build Triggers’. This is required to remotely trigger a build
-
Furthermore, create a ‘Build step’ in the section ‘Build’ by selecting ‘Invoke Nirmata Service’ and select ‘Update App in Catalog’ from the drop-down
-
Nirmata Endpoint - Enter base URL of the platform (default: nirmata.io)
-
Nirmata API Credentials - Select API key from the drop-down if already configured in the first step or else click ‘Add’ to add credentials
-
Catalog Applications - Select application which should be updated, from the dropdown
-
Timeout - Enter a time period to wait to pull the result from Nirmata
-
List of directories - Enter the relative path of the directory w.r.t locally stored repository containing YAML/JSON files. Multiple directories can be included using comma separator.
-
Include File Pattern - Add filename/extension/regex that should also be included for updating an application. By default, all .yaml, .yml, .json files present in the specified directories above would be included. Note that multiple filename/extension/regex can be included using comma separator.
-
Exclude File Pattern- Add filename/extension/regex for files in the mentioned directories that should be excluded for updating an application. Note that multiple filename/extension/regex can be excluded using comma separator.

-
-
Save/Apply configuration of the job
-
This job would be triggered on detection of a commit/change in the specified Git repo
-
The ‘Update App in Catalog’ build step is marked successful if all the YAML/JSON files are imported successfully else it is marked as failed if any issue is encountered

3. Deploy an ephemeral application
-
Create a new freestyle project
-
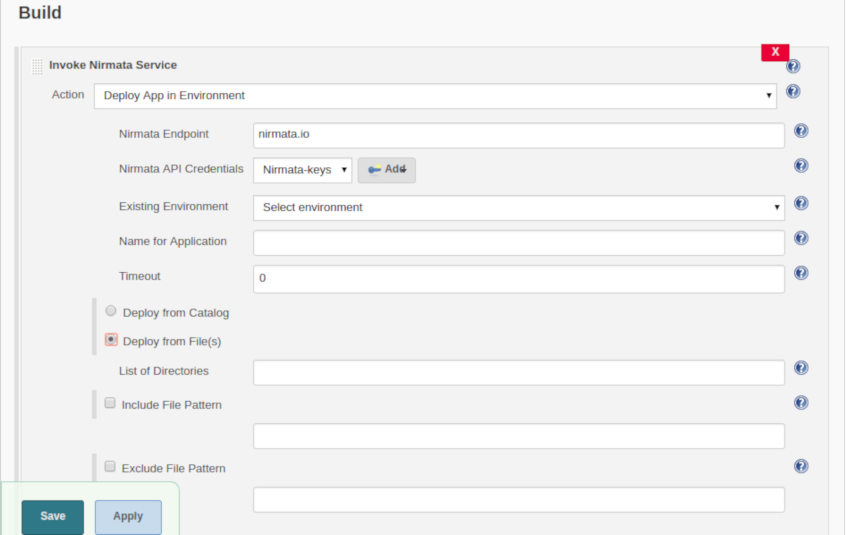
Create a ‘Build step’ in the section ‘Build’ by selecting ‘Invoke Nirmata Service’ and select ‘Deploy App in Environment’ from the drop-down
-
Nirmata Endpoint - Enter base URL of the platform (default: nirmata.io)
-
Nirmata API Credentials - Select API key from the drop-down if already configured in the first step or else click ‘Add’ to add credentials
-
Existing Environments - Select environment from the list in the drop-down
-
Name for the application - Specify the name by which the application should be deployed in the platform
-
Timeout - Enter a time period to wait to pull the result from Nirmata
-
Select 'Deploy from catalog' if the application should be deployed from the Nirmata catalog
-
Catalog Applications - Select the application which should be deployed, from the dropdown
-
Select 'Deploy from File(s)' if the application should be deployed using .yaml/.json/.yml
-
List of directories - Enter the relative path of the directory w.r.t locally stored repository containing YAML/JSON files. Multiple directories can be included using comma separator.
-
Include File Pattern - Add filename/extension/regex that should also be included for updating an application. By default, all .yaml, .yml, .json files present in the specified directories above would be included. Note that multiple filename/extension/regex can be included using comma separator.
-
Exclude File Pattern- Add filename/extension/regex for files in the mentioned directories that should be excluded for updating an application. Note that multiple filename/extension/regex can be excluded using comma separator.
-
-
-
Save/Apply configuration of job and execute an initial build by triggering ‘Build Now’ from the side panel
-
The ‘Deploy App in Environment’ build step is marked successful if the application deployed in the environment else it is marked as failed if any issue is encountered

4. Delete an ephemeral application
-
Create a new freestyle project
-
Create a ‘Build step’ in the section ‘Build’ by selecting ‘Invoke Nirmata Service’ and select ‘Delete App in Environment’ from the drop-down
-
Nirmata Endpoint - Enter base URL of the platform (default: nirmata.io)
-
Nirmata API Credentials - Select API key from the drop-down if already configured in the first step or else click ‘Add’ to add credentials
-
Existing Environments - Select environment from the list in the drop-down
-
Running Applications - Select the application which should be deleted, from the dropdown
-
Timeout - Enter a time period to wait to pull the result from Nirmata

-
-
Save/Apply configuration of job and execute an initial build by triggering ‘Build Now’ from the side panel
-
The ‘Delete App in Environment’ build step is marked successful if the application is deleted successfully else it is marked as failed if any issue is encountered

Pipeline workflow
-
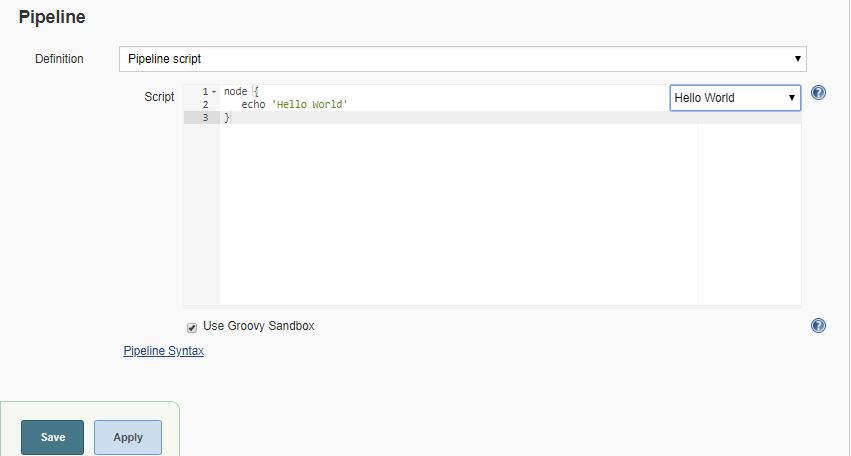
Create a new pipeline
-
Select ‘Hello World’ from the side drop-down under the section ‘Pipeline’ and click on ‘Pipeline Syntax’
-
Select ‘git: Git’ from the ‘Sample Step’ drop-down. Enter the URL of the GitHub repository. Specify the branch name of the repository. Click on ‘Generate Pipeline Script’ and copy the script generated. Note that this is required only for the ‘Update’ actions

-
Select ‘nirmata: Invoke Nirmata Service’ from the ‘Sample Step’ drop-down, select the required action from the drop-down and select\enter the appropriate parameters. Click on ‘Generate Pipeline Script’ and copy the script generated

-
Add the scripts generated above inside 'node' script as shown below

-
Save/Apply configuration of job and execute an initial build by triggering ‘Build Now’ from the side panel

Note: Similar workflows can be generated for 'Update App in Catalog'/'Deploy App in Environment'/'Delete App in Environment' actions.
Version history
Version 1.0.0
- Initial release
Version 1.0.1
- UI Improvements
Version 1.0.3
- Pipeline support added
Version 1.0.4
- Improvements and support deployment of application through files
Version 1.0.8
- Master-slave configuration support added
Version 1.0.9
- 'cloudbees-folder' plugin support added
Version 1.0.10
- Bug fix
Version 1.0.11
-
Changes from Nirmata 2.4